Showing posts with label Decor. Show all posts

Wednesday, January 21, 2015

Perk Up Your Wine Glasses DIY By Glue


What You Need:
  •  Scissors
  •  Foam brush
  •  Mod Podge (Glossy)
  • 6-8 Wine Glasses
  • Glass Cleaner
  •  Pen
  • 1 Sheet of Scrapbook Paper with desired pattern (I used a black damask pattern)


Directions:

Step 1: Gather all the materials and tools listed above. I purchased the mod podge and foam brushes from Michaels Arts & Crafts store. To start, trace out the base of each wine glass on the sheet of scrapbook paper. I choose to use a set of 6 multi size wine glasses. Nothing fancy, I just used cheap ones I had sitting in the back of my cabinet which you can easily find at Dollarama.
Step 2: Once you have traced out the base of each wine glass on the sheet of scrapbook paper cut them out. Cut along the inside of your outline so that the circle is slightly smaller than the base of your glass. After cutting out all your circles place your wine glasses upside down and check to ensure that each cut out is properly sized. Make adjustments if needed. 
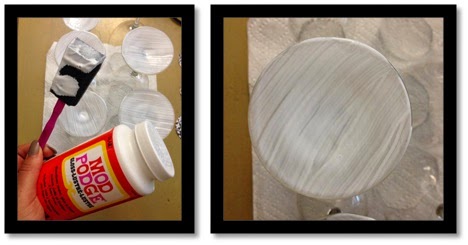
Step 3:Keep your wine glasses upside down.  It is almost time to start mod podging, but first use a glass cleaner (I used Windex) to clean the base of your wine glasses. Now you can grab your foam brush, dip it in the mod podge and paint a thin layer on each base. You will need to do this two to three times, waiting about 2 minutes between each layer for it to dry. I know it looks like a gluey mess right now, don't be worried, the mod podge will dry clear within 24 hours. Yes I said 24 hours!  This project will need to dry overnight.

Step 4: Now that you have waited patiently gently press your paper circle down on the base of the wine glass, smoothing out any creases or air pockets.  

Step 5: Apply two more thin layers of modge podge on top of the paper circle base waiting 2 minutes between each layer. It will look something like this.


Step 6: Give it 24 hours to dry completely clear. Lastly, enjoy your new and improved wine glasses! 


Makeup Brush Organizer DIY by Glitter

Do you ever find that your makeup brushes never look pretty or organized in your drawers, makeup bags or all over the bathroom counter? Well here is a cute little DIY, that is cheap, easy and will help you stay organized while you are doing your makeup! First things first, the supplies you will need will be, of course your makeup brushes to put in the finish product, but to make this brush vase you will need a short square glass vase, and little pebbles. Depending on your décor in your bathroom you can use colourful pebbles, or keep it simple and use the clear ones. Now the best part of it all, it will cost you under $10, and only three simple steps! All these materials you will and can find are at your nearest dollar store! Now lets get started! 

What you will need: 

  • Square Glass Vase 
  • Pebbles
  • Makeup Brushes 

Step 1: Now get all your materials ready and start putting it all together! I also added some bling around the edges just to make it more pretty!

Step 2: Before anything make sure you wash the vase for it to be clean and clear. Next, pour your pebbles into the vase, if they are the little ones like mine, pour it slow so they don’t go everywhere!


Step 3: After that, just simply start putting your brushes in the pebbles in any order you like and they stand up straight and stay there.      


Now you have yourself a cute, organized brush holder and no longer have a messy brush drawer or makeup bag! Enjoy!